Rotator Cuff Tear

Inexpensive, natural treatment for a rotator cuff tear

How I recovered from a rotator cuff tear with home exercises and no medication.

My mission: To recover from a 50% partial rotator cuff tear within 6 months by doing rotator cuff exercises at home, and without surgery or medication.

You can either check out the excellent 7-step rotator cuff treatment program I used. or read my story and see how I achieved my goal…

But first, have a look at one of my before and after pics:
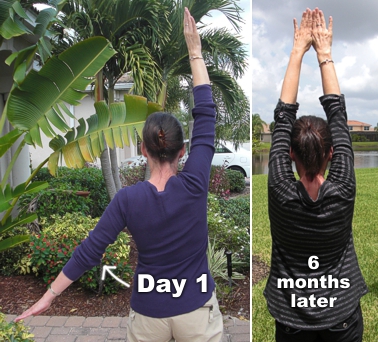
On the LEFT I'm trying to raise both my arms after I tore my rotator cuff. Looking back at this photo, it's hard to believe that's as high as I could raise my left arm. On the RIGHT...that's just 6 months into my rotator cuff exercise program!

LEFT: Here I’m raising my left arm as high as I could after my rotator cuff injury. This was the day I started the 7-step rotator cuff treatment system.  RIGHT: This is after six months on the exercise program.


After I tore my rotator cuff I had very limited range of motion in my left arm, as this demonstrates:
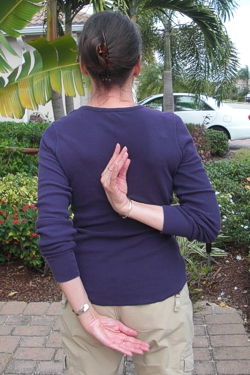
This image demonstrates my limited backward motion with my injured arm.

Here I’m trying to reach between my shoulder blades with my left arm – I can’t even reach the bottom of my t-shirt!

My story: When an orthopedic surgeon prescribed anti-inflammatory meds, cortizone shots under x-ray, and a physical therapist as treatment for my 50% partial rotator cuff tear, I did some thorough research—and decided to consider other options instead.

In addition to avoiding these harmful medications, I also wanted to avoid the expenses that come with these drugs, and the cost of doing rotator cuff exercises with a therapist.

The cortisone shot my doctor recommended would have been done under x-ray guidance (at a cost of $450), and the anti-inflammatories would have been the heavy duty stuff, followed later by Celebrex—a drug that gave a good friend of mine serious stomach problems.

I already knew that shoulder exercises are standard treatment for a torn rotator cuff. If you want to regain your range of motion after a rotator cuff injury, months of physical work is inevitable. But I don’t believe in killing the pain with a cortisone shot and then forcing your arm into places it’s not ready to go.

So I spent hours researching a kinder, more natural rotator cuff treatment.

I chose Brad Walker’s 7-Step Rotator Cuff Treatment System, an easy and affordable rotator cuff exercise and stretching program that comes with the option of personalized phone and email support if you want it. But before buying it I wanted to know if it could be used by people who were not on anti-inflammatory medication, so I emailed Brad Walker for more info.

Brad responded promptly with:

Yes, I would recommend that you work through the steps in the 7 Step Rotator Cuff Treatment System instead of resorting to medication. I’ve had a number of clients with greater than 50% partial tear, who have fully recovered by using the 7 Step System, so there is no reason why you can’t achieve the same result.

The other thing to realize is that if you currently have a 50% tear, it’s way too early to start physical therapy. If you have medication and go to physical therapy now, the medication will mask the pain you would normally feel and the physical therapy will do more harm than good.

There are 4 steps in the 7-Step System that you need to complete before even thinking about physical therapy…

Brad’s philosophy on treating a torn rotator cuff matched mine exactly, so I purchased his ebook here – you’ll need to scroll down the page to see it – and got going immediately. I liked the fact that Brad’s system also focuses on making your shoulder strong and stable to reduce the risk of future injury and shoulder pain.

If you want to know more about who I am or the backround of my shoulder injury, read about me here.  If not, read on…

Who is the 7-Step Rotator Cuff Treatment System designed for?

I recommend this exercise system if:

  1. You have a confirmed diagnosis of a partial rotator cuff tear (not a complete tear which may require surgery first, followed by rotator cuff exercises).
  2. You have to do rotator cuff exercises after surgery.
  3. You are experiencing shoulder pain and limited arm movement due to age (wear & tear) or to old injuries, and would like to improve the health and strength of your shoulders.
  4. You’re simply looking for shoulder strengthening exercises to improve and maintain your rotator cuff stability.

Click here to see how I progressed as I worked though my rotator cuff treatment >

or, click here to go straight to the torn rotator cuff treatment program I used >

I cannot divulge specific details of the individual rotator cuff exercises as I would be violating the terms of the Program Author’s copyright, but I followed all his instructions precisely and, based on my progress, you can decide whether it’s worth your while investing in the 7-step rotator cuff treatment system yourself.

Have a Happy Rotator Cuff Recovery.  I did! If you choose to use the 7 step rotator cuff treatment system, please keep me posted on your progress 🙂

~Caro

Legal and Health Disclaimer: The information on this website is for information purposes only. It reflects my personal experience using The 7-step Rotator Cuff Treatment System for guidance through rotator cuff exercises. It is not intended to replace the medical advice from a licensed physician or medical practitioner. Before considering ANY procedure, exercise or general advice please consult with a doctor.
A Natural Anti-inflammatory and Muscle Pain Relief Cream

What is the best natural anti-inflammatory and muscle pain relief cream?

Pain relief and anti-inflammatory creamWhen I started the exercise program that resulted in my complete recovery from a rotator cuff tear I tried Rub-on-Relief anti-inflammatory and pain relief cream because it was the cream recommended in the program.
As I was treating my rotator cuff injury myself I wanted to use the best anti-inflammatory & pain relief cream I could find, and this seemed like a good starting point.

But by the time I’d researched other over-the-counter creams, and used Rub-on-Relief for a few weeks, I discovered that it actually was the best cream for my purpose. And I liked that Rub-on-Relief aligned with my plan to overcome my rotator cuff injury without resorting to extreme medications like heavy-duty anti-inflammatories and cortisone shots.

The more I used it the more I liked it. I’ve used prescription pain creams and gels before and I don’t feel they did a better job relieving pain or inflammation than Rub-on-Relief.  I’ve also used other over-the-counter creams, like the ones that feel both hot and cold, and once again—no better.

This is what I like about Rub-on-Relief, in order of priority:

  • Not tested on animals. Rub-on-Relief features the official Leaping Bunny Logo. 
  • The ingredients. I’m an avid label-reader and do my best to avoid products with long lists of unpronounceable chemicals, preferring ingredients I recognize.
  • The consistency. The cream is thin and non-greasy.
  • You can massage with it. Unlike other hot-cold creams it actually makes a great lubricant for a short self-massage. Don’t use it for a long massage because eventually your skin will redden. But if you’re massaging your own shoulder, chances are it won’t be a long massage anyway.
  • The smell. It doesn’t have a medicated smell, but rather a fresh, menthol fragrance.
  • It’s ‘natural’. I’m skeptical of the word natural—hence the quotations. The word’s been abused by marketers to the point of being meaningless. But for what it’s worth, the ingredients are largely plant-based and acceptable to fans of homeopathic medicine.
  • It lasts. A little goes a long way.

So, is Rub-on-Relief the best anti-inflammatory and muscle pain relief cream?

It certainly is the best one for me. For the reasons above, and because I’ve yet to find a cream that provides better relief. Even the popular Voltaren Gel—an NSAID that can lead to high blood pressure or worsening of high blood pressure, which [in turn] may add to the increased risk of heart attack and stroke*—has not produced better results for me when I used it in the past. At best, the degree of relief I experienced felt similar for both products.

If you’d like to try it yourself, click here to order some. 

I wish you a successful recovery and a pain-free future 🙂

~Caro

Click here to see the rotator cuff recovery program I used. 

Click here to read about my own rotator cuff recovery process – and see before and after photos.

Legal and Health Disclaimer: The information on this website is for information purposes only. It reflects my personal experience using The 7-step Rotator Cuff Treatment System for guidance through rotator cuff exercises. It is not intended to replace the medical advice from a licensed physician or medical practitioner. Before considering ANY procedure, exercise or general advice please consult with a doctor.

 *Reference: 

http://www.voltarengel.com/hcp/references.aspx

Rotator Cuff Home Treatment

How to treat your rotator cuff injury at home, the natural way.

Can you successfully treat your own rotator cuff after an injury?

You can, and I did. Very successfully. In fact I was so impressed with the home rotator cuff exercise program I used that it inspired me to start this blog to record my progress. You can see my before and after photos here.

If you’re considering doing rotator cuff exercises at home and not with a therapist, first identify the exact condition of your rotator cuff muscles so you don’t make an existing problem worse. If you have rotator cuff pain and are not sure of the cause, see a doctor before you start the exercises.

Examples:

  • You’re recovering from rotator cuff surgery.
  • You have a partial rotator cuff tear and want to regain use of your arm.
  • You’ve recovered from a tear or surgery and want to build shoulder strength and flexibility.
  • You’re working to maintain healthy rotator cuffs to prevent problems in the future (I wish I had done this…I could probably have avoided tearing my rotator cuff).

Which rotator cuff home treatment did I use?

For my home treatment, I chose the 7-step rotator cuff treatment system.

I was skeptical when I ordered the program as I’m notorious for not following through on exercise related activities. But I was also desperate—I was in pain and could hardly move my left arm.

I wanted home rotator cuff exercises for the convenience and flexibility a home rehab program offers, as well as what it would save me in physical therapy costs. Plus, my dad had just recovered from major shoulder surgery by doing rotator cuff exercises at home and he was extremely successful.

This is what I liked about the 7-step rotator cuff treatment system:

  • It was easy to follow. The exercises are illustrated and the text well written.
  • The exercises are simple—you don’t have to be athletic to do them.
  • It’s easy to fit the program into your schedule. You can allocate exercise time to suit your availability.
  • I started getting results fast, and achieved my goal before the end of the program.
  • I could do the exercises without cortisone shots, anti-inflammatory meds, or pain killers. I don’t like that stuff.
  • The program was inexpensive and no big financial outlays are required at any point.

Click here to see the rotator cuff recovery program I used

Click here to read about my own rotator cuff recovery process – and see before and after photos.

Legal and Health Disclaimer: The information on this website is for information purposes only. It reflects my personal experience using The 7-step Rotator Cuff Treatment System for guidance through rotator cuff exercises. It is not intended to replace the medical advice from a licensed physician or medical practitioner. Before considering ANY procedure, exercise or general advice please consult with a doctor.

Ginger and Turmeric for Rotator Cuff Injury Inflammation

Can ginger or turmeric be used to reduce rotator cuff inflammation?

Reducing inflammation promotes healing. While I was recovering from a partial rotator cuff tear I wanted to reduce the inflammation in my injured shoulder, but I also wanted to avoid risky anti-inflammatory drugs.

So I did some research and decided to try ginger and turmeric for inflammation.

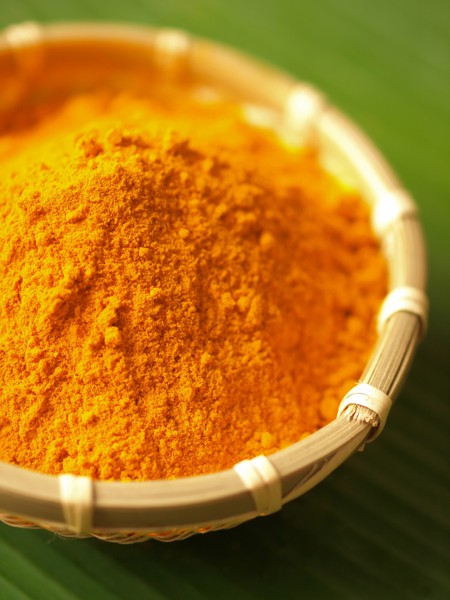
Ground Turmeric

Ground turmeric comes from a root that looks similar to ginger. It’s a great spice that can be used together with ginger, which has anti-inflammatory properties of its own.

Many people would have you believe that in order for turmeric to be effective, you have to take it in capsule form. Particularly people who are selling it in capsule form.

This is how I take turmeric

I drink half a teaspoon of turmeric in a small glass of apple juice or almond milk twice a day. I’m not crazy about the stuff, but my plan was to fix my arm come hell or high water so…hey-ho and bottoms up!

Apparently some people add it to coffee, vegetable juice, or smoothies. I haven’t tried that yet—but no doubt I will.

Given that a teaspoon of turmeric is not considered a lot, I also sprinkle it in my food a couple of times a week. It’s great in rice dishes, stews, curries, and my favourite South African dish—Chakalaka. The great thing about Chakalaka is that you can tweak the ingredients to suit yourself. I add vegetable stock and small potatoes and cook it till the potatoes are soft and the stock reduced.

The turmeric suggestion came from my friend Ann of Ann Heizer Physical Fitness in California. Turmeric is a potent natural anti-inflammatory with many other health benefits. (Turmeric should not be used by people with gallstones or bile obstruction.  Though turmeric is often used by pregnant women, it is important to consult with a doctor before doing so as turmeric can be a uterine stimulant.)

Ginger as an anti-inflammatory

Ginger was my other choice for reducing inflammation. I prefer it to Turmeric and happily toss it into many of my meals. It has the added benefit of lowering blood pressure.

Don’t consume more than 4g of ginger per day. Pregnant women should not take more than 1g per day.

This is how I like ginger

I buy fresh ginger root, wash it, and grate it as I need it. My favourite way to have ginger is in coconut milk before I go to bed.

Ginger as an anti-inflammatory

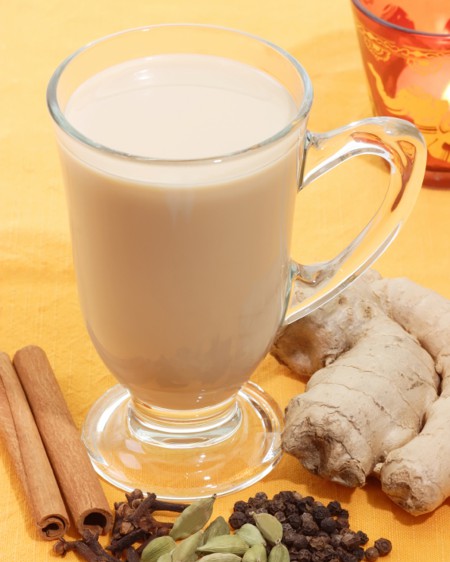
Add ginger to milk, almond milk, or coconut milk as an anti-inflammatory

I measure out a small glass of milk, place it in a saucepan on the stove, grate about a teaspoon of ginger into it, and let it simmer for a couple of minutes. You can vary the flavour by adding cinnamon, a drop of vanilla, or cardamom pods to the mix.

Then pour it back into the glass through a strainer and sweeten to taste. I add half a teaspoon of honey but be aware that sugar in any form is not good for inflammation, so be frugal.

Does turmeric and ginger really reduce inflammation?

I believe it does. I haven’t had any before-and-after inflammation-measuring tests so I can’t give you any scientific data, but after using turmeric and ginger for about 6 weeks I felt a a lot less pain in my shoulder. My arm feels less fragile and I don’t wince every time I bump against something.

I feel that my efforts have paid off and I’m glad I persisted with these two spices. I will probably always include them in my diet one way or another as a torn rotator cuff can continue to be bothersome for the rest of your life.

Other anti-inflammatory spices

Cumin, cinnamon, cardamom and garlic contain powerful antioxidants that help reduce inflammation. If you include two or more of these in your daily diet, amounts generally used in cooking can be enough to make a difference.

Things to avoid if you’re trying to reduce inflammation

Meat: replace it with Omega-3 rich fish; or legumes, beans, and whole grains.

Smoking: it reduces blood circulation. If you have a rotator cuff injury you’ll recover faster if you increase blood flow to the shoulder muscle. Massage improves criculation, but smoking does the opposite.

Another great resource for an anti-inflammatory diet is Dr. Andrew Weil’s Anti-Inflammatory Diet & Pyramid, which also includes turmeric and ginger.

Click here to see the rotator cuff recovery program I used (look under Products for the 7-step Rotator Cuff program)

Click here to read about my own rotator cuff recovery process – and see before and after photos.

Legal and Health Disclaimer: The information on this website is for information purposes only. It reflects my personal experience using The 7-step Rotator Cuff Treatment System for guidance through rotator cuff exercises. It is not intended to replace the medical advice from a licensed physician or medical practitioner. Before considering ANY procedure, exercise or general advice please consult with a doctor.

Does a rotator cuff tear ever heal? Recovery vs. Healing

Rotator Cuff: Recovery vs. Healing

Does a torn rotator cuff heal itself? It doesn’t, but you CAN recover from the injury.

Will my rotator cuff ever heal?

It is possible, and quite likely, that you’ll recover from a rotator cuff injury.

I successfully recovered from a torn rotator cuff using the 7-Step Rotator Cuff Treatment System (which you’ll find by clicking here and browsing under ‘Products).  I chose this system because I wanted to avoid high medical costs, anti-inflammatory medication and cortisone shots. I also wanted do the rotator cuff treatment at home, not at a physical therapist’s facility.

But it’s important to acknowledge a difference between rotator cuff healing vs. rotator cuff recovery.

A torn rotator cuff doesn’t literally ‘heal’. The rotator cuff muscle does not regrow like a broken bone, and it cannot re-attach itself. Instead, scar tissue forms at the injury site, but it’s not as strong as the original muscle tissue.

This is why I’m inclined to talk about recovering from a rotator cuff tear rather than healing a rotator cuff tear. After your pain has subsided and your range of motion has returned, your rotator cuff tissue is not as it was before.

  • Healing implies your rotator cuff might return to the same state it was in before you tore it. It doesn’t.
  • Recovery refers to the process of strengthening and improving your shoulder muscles to the point that you can get back to a normal life. I did, and you probably can too.
  • There’s also rotator cuff repair which is a surgical procedure done under anesthetic and is often unnecessary for a partially torn rotator cuff.

What can you expect from recovery?

The degree of recovery that can be achieved is different for everyone. Depending on how severely your rotator cuff was torn; how committed you are to doing your therapy exercises; and how you maintain your rotator cuff health—you can get your shoulder back into a very comfortable state.

Compare my experience before and after I completed the 7-step program:

Before the program:

  • My range of motion was severely limited.
  • When I moved my arm I often experienced sharp, intense pain.
  • If I bumped my arm, even lightly, the pain was excruciating and took about 15 seconds to subside.
  • I could not carry out normal daily tasks like blow drying my hair, undoing my bra at the back, pulling up my jeans, pulling my t-shirt over my head, and putting on a jacket.
  • I couldn’t find a comfortable sleeping position, and woke up many times each night in pain.

After the program:

  • My range of motion is over 95% back to normal.
  • Shoulder and arm pain is rare, and never severe.
  • I can once again carry out all the tasks I struggled with before. There’s a spot on my back that I can no longer easily reach with my injured arm, but I can live with that.
  • I can sleep in almost any position, and shoulder pain never wakes me anymore.

I think you’ll agree, that’s a pretty good recovery 🙂

Of course, the rotator cuff recovery process is different for everyone, as is the healing time.

Click here to see the rotator cuff recovery program I used.

Click here to read about my own rotator cuff recovery process – and see before and after photos.

Legal and Health Disclaimer: The information on this website is for information purposes only. It reflects my personal experience using The 7-step Rotator Cuff Treatment System for guidance through rotator cuff exercises. It is not intended to replace the medical advice from a licensed physician or medical practitioner. Before considering ANY procedure, exercise or general advice please consult with a doctor.

Choosing surgery for a complete rotator cuff tear—my father’s story.

Shivering in the UK with a torn rotator cuff - but having lots of fun.

My dad with his arm in the only position he could comfortably manage for the entire vacation.

While passing through the security point at Schiphol Airport in Amsterdam en route to the UK, my dad suffered a rotator cuff tear—a complete rupture of the supraspinatus tendon.

We live in different countries and were meeting in the UK for a long vacation. My dad, even at 74, was in good shape after a life of mountaineering, athletics and squash.

Exiting the plane after his first flight he headed for the security line for the next flight, but as he lifted his carry-on onto the conveyor he felt an excruciating pain and heard a tearing sound. The sound was so loud that even the security people hovering around him heard it and commented (yet still tried to force him to raise his arms in the x-ray machine).

Twelve hours of inactivity on a crowded flight and being squeezed against a very large person in the next seat had left him feeling stiff and cramped. I believe that the hours of sitting with his arm squashed against his side followed by the sudden action of lifting his carry-on with a cold shoulder muscle caused his rotator cuff to tear.

His symptoms started instantly:

  • extreme pain
  • weakness of the arm
  • very limited range of motion from the shoulder, particularly in a forward or upward direction
  • and a large lump which developed on his bicep

Once in England he went to a hospital the very next day. He was told that he’d torn a muscle and ‘nothing could be done, you just have to wait for it to get better on its own’. Based on this he waited, not only throughout our vacation (he remained in the UK for 2 months) but also for another 3 months after he returned home. Eventually the pain and the inability to use his arm at all lead him to get a second opinion from a top notch orthopaedic surgeon. He was told he needed surgery, and soon.

He opted for arthroscopic repair followed by many months of physical therapy exercises. He did the exercises unaided and at home as he lives in a remote area with no therapy centers. The exercise that helped him the most was a passive arm-raising exercise; he created a pulley system by looping a long rope over one of his ceiling beams and used his good arm to raise his other arm to a full stretch (eventually, not immediately after surgery).

The post-surgery experience

Two years post-surgery and my dad has 95% of his range of motion back again. I think that’s amazing considering the delayed surgery and his age.

He says the surgery was more painful than he expected, though he’d never had surgery before so had nothing to compare it to. The post-surgical pain lasted longer than he expected—at least a year—and sometimes his shoulder still gets a bit achey if he uses it a lot. He says his arm is still weaker than it used to be before he tore his rotator cuff, but weight-bearing exercises could improve that. After reading dozens of articles and rotator cuff forum comments, I understand that his post-surgery experience is fairly typical, and a lot better than many.

My dad was lucky to be a candidate for rotator cuff surgery at 74. It’s not always an option when you’re in your seventies. An orthopedic surgeon will determine the condition of your shoulder muscles and the surrounding tissue. Deterioration, calcification and arthritis could mean surgery’s out of the question.

Since my dad tore his rotator cuff I have experienced a 50% partial rotator cuff tear myself—the subject of many long distance phone calls as you can imagine. My tear did not require surgery and I chose to do physical therapy myself with no cortisone shots or medication. You can read how I recovered from my rotator cuff tear by clicking here >

Legal and Health Disclaimer: The information on this website is for information purposes only. It reflects my personal experience using The 7-step Rotator Cuff Treatment System for guidance through rotator cuff exercises. It is not intended to replace the medical advice from a licensed physician or medical practitioner. Before considering ANY procedure, exercise or general advice please consult with a doctor.

What happens when you skip your rotator cuff exercises for a few days?

I wrote this post when I was having difficulty sticking to my exercise schedule while doing a very effective program of rotator cuff exercises. But this advice applies to anyone who’s following an exercise program to treat an injured rotator cuff.

You may be lucky enough to get through many months of exercising your torn rotator cuff on a daily basis without interruption. But what if you have to skip exercising for a while?

What if illness, a vacation, or a busy schedule interrupts your daily rotator cuff exercise routine?

If you skip your rotator cuff exercises for a few days, don't try pick up where you left off.

Even if you’ve only missed 3 or 4 days of exercising your shoulder, don’t attempt to pick up where you left off. Remember that regardless of how impressive your progress has been – you’re still dealing with a torn rotator cuff.

This is what happened  to me:

I stopped exercising my shoulder for 3 days because I had a migraine, then I went away for a long weekend and skipped another 4 days.

When I returned home I simply picked up where I left off with my exercising. That was a big mistake! The next day I felt like I’d been in a car wreck. I suffered aches and pains in my arm and shoulder that I had not felt since the early days of my rotator cuff injury. And then I had to wait a few more days for the pain to ease before I could resume exercising my shoulder.

So what should you do if you miss a few days of exercising?

Invest 4 or 5 days doing the exercises you did in the early stage of the program, and slowly build up to where you left off. Your patience will pay off, I promise.

I overcame my set-back by revisiting the early steps of the program. I picked my favorite exercises from each step and slowly worked myself back to where I was before.

All in all I set myself back by nearly 3 weeks.   This is a mistake you can so easily avoid.

Click here to see the 7-step rotator cuff recovery program I used – you’ll find it under ‘Products’.

Click here to read about my own rotator cuff recovery process – and see before and after photos.

Legal and Health Disclaimer: The information on this website is for information purposes only. It reflects my personal experience using The 7-step Rotator Cuff Treatment System for guidance through rotator cuff exercises. It is not intended to replace the medical advice from a licensed physician or medical practitioner. Before considering ANY procedure, exercise or general advice please consult with a doctor.

Post Navigation